PI Software Technical Recommendations
This article serves as a guide to help ensure the best possible results when using the PI software. Some companies have heightened IT or email security policies (typically, but not limited to banks, financial institutions, and other high-security firms) that require a few extra steps to avoid errors in the software, or prevent PI software-related emails from being delivered. There are also recommended web browsers.
Safelisting of PI’s URLs and email servers is to be completed by your internal IT team; these actions are not performed from within the PI software. Safelisting is a process which allows website access for designated URLs (shared below) to prevent access issues or other errors related to your company’s unique network settings.
Safelisting URLs
The Predictive Index software utilizes several URLs. In order to prevent errors, and provide the best possible experience with the PI software, we recommend clients who may have strict IT security policies have their IT department safelist the PI URLs, found below:
Adding *.predictiveindex.com would be the best solution, as it would cover all PI URLs.
If that is not possible, here is a list of all PI URLs that should be added to ensure access and limit errors:
- accountmanagementapiservice-surl.predictiveindex.com
- api.predictiveindex.com
- app.predictiveindex.com
- http://app.launchdarkly.com/
- assessment.predictiveindex.com
- baapiservice-surl.predictiveindex.com
- brand.predictiveindex.com
- catalyst.predictiveindex.com
- checklist.predictiveindex.com
- clientdesign-surl.predictiveindex.com
- cog.predictiveindex.com
- cognitivepractice.predictiveindex.com
- cogsample.predictiveindex.com
- conductor.predictiveindex.com
- core-api.predictiveindex.com
- dataimportapiservice-surl.predictiveindex.com
- login.predictiveindex.com
- pi.assess.predictiveindex.com
- pi.predictiveindex.com
- playbook.predictiveindex.com
- prod-clienthire-surl.predictiveindex.com
- prod-designapiservice-surl.predictiveindex.com
- prod-diagnoseapiservice-surl.predictiveindex.com
- prod-eventstreaming-surl.predictiveindex.com
- prod-hireapiservice-surl.predictiveindex.com
- prod-permissionsapiservice-surl.predictiveindex.com
- prod-valuemetricsapi-surl.predictiveindex.com
- puppeteer.predictiveindex.com
- snapfactory.predictiveindex.com
- status.predictiveindex.com
- survey.predictiveindex.com
- tools.predictiveindex.com
- tpi-auth.predictiveindex.com
- userapiservice-surl.predictiveindex.com
We also recommend safelisting the following non-PI URLs:
- *.rollout.io
- analytic.rollout.io
- conf.rollout.io
- statestore.rollout.io
- push.rollout.io
- tpi.getfeedback.com
Email Servers
The Predictive Index software sends emails from several places. Per our SPF record for the predictiveindex.com domain, emails are sent from several hosted cloud systems without dedicated IP addresses. Email servers typically look at the SPF records for incoming email to make sure the email is coming from an approved source. To ensure delivery all of all PI software-related emails, please ensure your IT team has safelisted the following:
- 192.254.123.39
- predictiveindex.com
- mailer.predictiveindex.com
- outbound.research.net
Protecting Your Emails
The Predictive Index recommends the following security best practice to protect email addresses from unwanted exposure. Sharing a link that contains information such as employee and candidate emails can be dangerous as they can be used for malicious purposes such as cyber attacks and spam emails.
Here is an example of how email addresses might be exposed when you create a shareable link:
https://assess.predictiveindex.com/oi2/****?person_type=Other&folder_id=********-0664-4210-9dc5-6c8f9b3ecbc8&user_id=********-0dd5-45e8-a8f9-70a107dd1e29&send_ca_on_ba_completion=false&sendAnalystCompletionEmail=true&stakeholder
EmailList=john@doe.com;jane@doe.com;info@company.com
Before sending any shareable Predictive Index links, we suggest modifying the link to exclude stakeholder email addresses, just like the example below:
https://assess.predictiveindex.com/oi2/****?person_type=Other&folder_id=********-0664-4210-9dc5-6c8f9b3ecbc8&user_id=********-0dd5-45e8-a8f9-70a107dd1e29&send_ca_on_ba_completion=false&sendAnalystCompletionEmail=true
Recommended Web Browsers
For best results with the PI software, please use Google Chrome as your browser.
Clearing Your Cache
If you are having difficulties logging in or accessing features within the software, it could be related to your browser cache. If you clear your browser cache, this should resolve the issue for you.
Below are the steps to take to clear your browser cache:
In Google Chrome:
1. On your computer, open Chrome.
2. At the top right, click on the 3 dots menu.
3. Click More tools > Clear browsing data.
4. At the top, choose a time range. To delete everything, select All time.
5. Select the checkboxes next to “Cookies and other site data” and “Cached images and files.”
6. Click Clear data.
7. Close all browser windows and re-open a new window
In Mozilla Firefox:
1. Select the Menu button.
2. Select Options.
3. Select Privacy & Security.
4. Under Cookies and Site Data, select Clear Data.
5. Close all browser windows and re-open a new window.
In Safari:
1. Select Safari.
2. Select Preferences.
3. Select the Advanced tab.
4. Select Show Develop Menu in menu bar located in the bottom.
5. Select Develop (to the right of where the Safari button is).
6. Select Empty Cache.
7. Close all browser windows and re-open a new window.
In Microsoft Edge:
1. At the top right, click on the 3 dots menu.
2. Select Settings.
3. On the left menu, select Privacy, Search, and Services.
4. Under Clear Browsing Data, select Choose what to clear.
5. Change time range to All Time.
6. Select Clear Now.
Unable to Safelist
Setting up individual email client rule to prevent PI Software email notifications from going to spam/junk:
If the event that you are unable to safelist the above addresses and/or domains from your email service provider or your IT department is unable to do so, we suggest setting up an individual rule/filter within your email client to prevent our platform’s email notification from going to your spam/junk. This may also help you receive our platforms email notifications in the event you are not receiving them intermittently or not at all. Please reference the following instructions on how to set up the email client rules/filters for your respective email client.
Gmail:
- In Gmail, look for the Gear icon towards the upper right of your browser.
- Select Settings.
- Towards the top, select the Filters and Blocked Addresses tab.
- Scroll to the bottom of the page.
- Select Create a new filter.
- In the From field, please enter “noreply@mailer.predictiveindex.com”
- In the bottom right of the same window, select Create filter.
- Select the Never send to spam checkbox.
- Select Create filter to complete the setup.
- Repeat these steps, but with “@predictiveindex.com” instead of “noreply@mailer.predictiveindex.com”
Outlook (Windows):
- In Outlook, under Home, select Rules.
- Select Manage Rules & Alerts.
- Select New Rule.
- Select Apply rule on messages | receive.
- Select the from people or public group checkbox.
- In Step 2 box, select highlighted “people or public group”
- In the From field, enter “noreply@mailer.predictiveindex.com”
- Select Next.
- Select the move it to the specified folder checkbox.
- In Step 2 box, selected highlighted “specified”
- Select Inbox
- Name your new rule.
- Select the Turn on this rule checkbox.
- Select Finish.
Outlook (Mac):
- Inside Outlook, in the top-left corner, select Outlook.
- Select Preferences.
- Select Rules.
- With the Exchange option selected/highlighted, select the “+” icon on the bottom of the window to
add a new rule. - Create new rule set with the following information (note: the two addresses you will be white listing
will be @predictiveindex.com and noreply@mailer.predictiveindex.com).

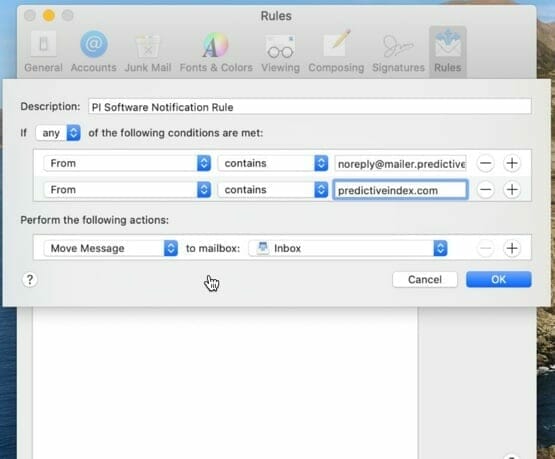
Apple Mail:
- Inside Apple Mail, in the top-left corner, select Mail.
- Select Preferences.
- Select the Rules tab.
- Select Add Rule.
- Complete rule set with the following information (note: the two addresses you will be white listing
will be @predictiveindex.com and noreply@mailer.predictiveindex.com)
To inform us of a typo or other error, click here. To request a new feature, click here.