Download Assessment Data CSV Report
Using the latest version of our software, PI2? Click here for the right support article.
You have the ability to gather assessment results into one report by downloading a csv file from the software. This report can include all data in your account or from a specific group, folder or job.
Download CSV report
1. From any list view in the software you can download assessment data as a csv report. For a report of all assessment data, click ‘view all’ on the ‘Recently Completed’ box from the dashboard. This will take you to all completed assessments.
For a specific group of people, you can locate the group or folder in your account.
For a group of candidates attached to a job, you can navigate to that specific job in you account.
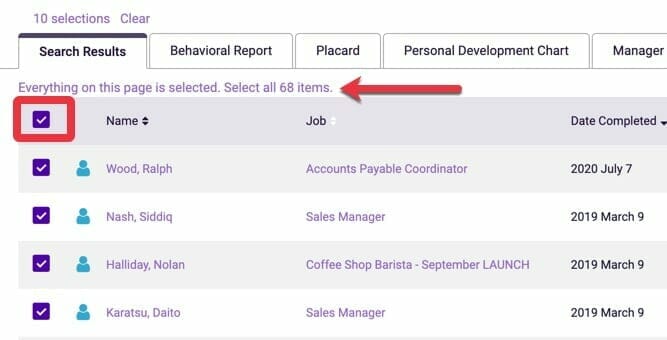
2. From the list view, check off the names you would like to download assessment data for.
To select all names on the list, click the top check box to select all assessments. Then Click ‘Everything on this page is selected. Select all XXX items’. This will select all completed assessments, not just the ones you are viewing on page 1.
TIP: If you would like to filter this list, click the ‘Filters’ button at the top to view different filtering options for your list.
3. Click the ‘Admin’ drop down on the right and then select ‘Download CSV’.

4. The CSV file will automatically start downloading for you to then open and view the results.
Download CSV report for non-english users
When downloading a CSV file in a language other than English, you may experience the names and data not appearing correctly in the document. The below steps will format the data so the characters appear as they should.
Option 1 – Update Excel File Format
1. First download your csv report from the software. See the steps above for guidance on how to do this.
Save this file to your computer and then can close out of the file.
2. Open a new, blank Excel Workbook on your computer.
3. In the Data tab of Excel, click ‘From Text’.
3. Select the .csv file that you previously saved and click ‘Get Data’.
4. In the Text Import Wizard pop-up window, under Original Data Type, select Delimited. Under the File Origin select UTF-8. It may be called 65001: Unicode (UTF-8). Then click Finish.
5. When asked where you want to put the data, click okay. The data should then appear correctly in the new excel file.
Option 2 – Open in Google Drive
Note: This option will only work if you have a google account.
1. First download your csv report from the software. See the steps above for guidance on how to do this.
Save this file to your computer and then can close out of the file.
2. Login to your google account and access your Drive.
3. Click the ‘New’ button in the top left corner and select Google Sheets. A black document will open in a new tab.
4. Update the name of your worksheet.
5. Select the file drop down and click ‘Import’.
6. Select the Upload tab in the pop up and select the excel file you downloaded from the software. Click select.
7. Click Import Data. Your data should then populate in the google sheet with the correct characters.
To inform us of a typo or other error, click here. To request a new feature, click here.